
I spent three years brewing in a garage before I finally committed to going commercial. That gap between 20-gallon batches and a real brewhouse is deceptively wide. Most of the advice I found online was either from equipment manufacturers selling dreams or from brewers who had already made it and glossed over the messy middle. What I wish someone had told me, in plain language, is how much of the first year is spent undoing assumptions you made about equipment before you even signed the lease.
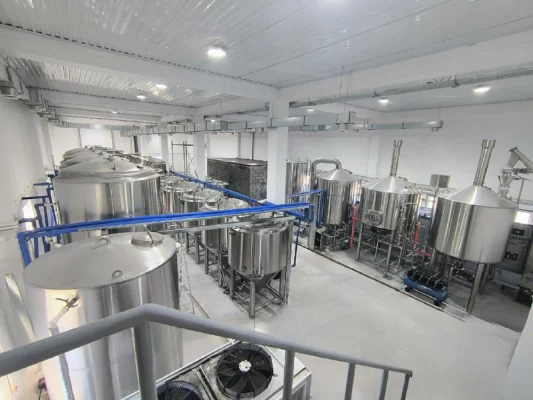
Microbrewery equipment, typically producing under 15,000–18,000 barrels per year, is the heart of a small-scale operation. It determines your batch throughput, your labor cost per gallon, and how many hours you spend scrthing rather than brewing. Getting the configuration wrong means living with inefficiency for years, because swapping a brewhouse after opening is financially brutal.
Sizing a Brewhouse: The Barrel Number That Lied to Me
The Brewers Association defines a microbrewery as producing fewer than 15,000 barrels annually. I had read that stat a dozen times. What I didn’t internalize was that a 5-barrel system producing two batches a day, five days a week, yields around 2,500 barrels a year — if everything runs perfectly. The first six months, you’ll be lucky to hit one batch per day.
Equipment suppliers like Hgmc offer everything from 1-hectoliter systems up to 500-hectoliter industrial setups, with 2-, 3-, and 4-vessel configurations. When I was shopping, I fixated on the 7-barrel brewhouse because it sounded serious. A 7-barrel system meant I could produce more beer than my friends with 3-barrel rigs, and I’d “grow into it.” In reality, that 7-barrel system required a larger lauter tun than my 8-foot ceilings could accommodate, and I ended up paying for a custom low-profile vessel that delayed delivery by eight weeks.
The lesson I learned too late: size down for the first 18 months. A 3- or 5-barrel system is easier to fill, easier to clean, and far more forgiving when your fermentation schedule is still unpredictable. The capital you save on the brewhouse goes toward cold storage, which is where most breweries hit their real bottleneck.

Vessel Configuration: The Choice Between Speed and Flexibility
Every brewhouse comes down to how many vessels you have and how you heat them. Hgmc offers 2-, 3-, and 4-vessel configurations, and each choice forces tradeoffs that aren’t obvious from a spec sheet.
A 2-vessel system combines the mash tun and lauter tun into one vessel, and the kettle and whirlpool into another. It saves floor space and is cheaper, but it also pushes the lautering step into the same tank where you mashed, so you lose the ability to sparge independently. I watched a friend with a 2-vessel setup struggle with stuck mashes on high-protein recipes because he couldn’t adjust the grain bed depth without dumping the entire batch. For someone planning to brew a single flagship beer indefinitely, it works fine. For a brewer who wants to experiment, it is a constant constraint.
The 3-vessel system gave me a separate lauter tun, which meant I could control grain bed depth and sparge rate independently. That flexibility saved me more than once when a recipe called for a large percentage of flaked adjuncts. The downside: the lauter tun sits empty for part of the brew day, and the extra vessel adds cleaning time. On a double-batch day, that extra rinse cycle meant I was leaving at 9 p.m. instead of 6 p.m.
A 4-vessel system typically adds a dedicated hot liquor tank or a separate whirlpool. I considered it for about a week before I looked at the price tag and the floor plan. Unless you are planning to brew six days a week and chase very specific hop profiles, the complexity outweighs the benefit.
The heating method matters more than I expected. Electric heating is clean and efficient but draws a massive load — a 1,500-liter electric brewhouse can pull 144 kW. That meant upgrading my electrical panel and paying a demand charge to the utility. Direct fire is simpler but introduces uneven heat distribution, which can scorch wort in the kettle. Steam heating is the gold standard for even temperature control, but it adds a boiler and a separate set of maintenance tasks. I chose electric because I had no steam experience, and I still question that decision every time the electric bill arrives.
Space Planning: The Square Footage I Underestimated
I read the guidelines: 1,500 to 3,000 square feet for a small microbrewery. That number sounded generous until I mapped out the brewhouse, fermentation room, cold storage, packaging area, ingredients storage, lab bench, and office. My initial layout put the brewhouse against one wall and the fermenters in a cluster. The walk-in cooler ended up behind the packaging line, and I had to squeeze between crates every time I pulled a keg.
A 7-BBL system from Hgmc typically needs around 550 to 1,200 square feet for the equipment footprint alone, but that number assumes you have a rectangular space with ceiling height over 12 feet. My space was an irregular former auto shop with 10-foot ceilings, which forced me to use horizontal fermenters instead of the usual vertical uni-tanks. Horizontal tanks are harder to clean, take up more floor area, and make it difficult to harvest yeast efficiently. I kept them for two years before I reconfigured the layout and switched to vertical units.
The one thing I did right was leaving extra space around the brewhouse for cleaning. The kettle and lauter tun need enough clearance to open the manhole covers completely, and the floor needs to slope toward a central drain. A flat floor under a brewhouse means stagnant water and, eventually, a call to a contractor you can’t afford.
Automation: How Much Control Do You Actually Want?
The spectrum of automation in microbrewery equipment runs from semi-automatic (manual valve operation with temperature sensors) to fully automatic (PLC-controlled with recipe programming and automated CIP cycles). I started with a semi-automatic system because I thought I wanted “hands-on” control. What I discovered was that manual mashing means standing over a mash tun for 90 minutes, checking the temperature every ten minutes, and making small adjustments that a cheap PID controller could do more consistently.
After a year, I retrofitted a basic automation package. It cost about $8,000 and took two weeks to install. The immediate change was not speed — the brew day still took the same amount of time — but consistency. The temperature gradients across the mash tun narrowed. The boil-off rate became predictable. The first batch after the upgrade hit exactly the original gravity I was targeting, and I realized how much variance I had been introducing by hand.
That said, full automation isn’t always worth it for a microbrewery. If you are brewing the same two recipes week after week, a fully automated system will save you labor and reduce human error. But if you are still developing recipes or plan to pivot seasonally, you will fight the PLC because every new recipe requires programming steps that a semi-automatic brewer can adjust on the fly with a valve and a thermometer.
I saw a local brewery install a fully automated 10-hectoliter system and then spend six months debugging the malt milling curve. They eventually hired a part-time automation specialist just to manage the software. That is a cost most startup brewers do not budget for.

The Cold Storage Trap
Almost every equipment conversation centers on the brewhouse. The cold storage is an afterthought until your first batch of IPA sits at 55°F instead of 38°F and the haze degrades in a week. I budgeted for a 20-foot walk-in cooler and filled it within the first month. My fermenter space was adequate, but the bright tank space was not. I ended up crashing beers in fermenters and tying up tanks that could have been making the next batch.
A rule of thumb I later heard from a veteran brewer: allocate at least 1.5 times your batch volume to cold storage capacity for the first year, and plan on doubling that in year two. Mine was barely 1:1, and I paid for it in rushed transfers and inconsistent carbonation.
Unanswered Questions and Unfinished Thoughts
I still don’t know if I made the right choice on electric versus steam. The electric brewhouse has been reliable, but the utility costs are creeping up year after year. I have looked at converting to steam, and the payback period is around four years — assuming I can stomach the downtime during the conversion.
I also never fully solved the floor drainage problem. The slope was wrong from day one, and fixing it now would mean jackhammering half the brewery. A three-inch puddle collects under the mash tun after every cleaning. I sweep it toward the drain with a squeegee, and I doubt I’ll ever fix it.
Those small annoyances accumulate. They are not the kind of thing that show up in a manufacturer’s brochure. But they are the real texture of running a microbrewery, and they matter more than a shiny 4-vessel setup.
FAQ
What is the typical capacity of microbrewery equipment?
Microbrewery equipment is designed for annual production under 15,000–18,000 barrels. Batch sizes commonly range from 1 hectoliter (about 0.85 barrels) to 30 hectoliters (about 25.5 barrels), though most startups begin with 3–7 barrel systems.
How much space do I need for a 5-barrel microbrewery?
A 5-barrel brewhouse plus fermentation and cold storage typically requires 1,500–3,000 square feet. The equipment footprint alone is roughly 300–500 square feet, but you need room for packaging, ingredients, a small lab, and an office. Ceiling height should be at least 12 feet if you use vertical fermenters.
Should I choose a 2-vessel or 3-vessel brewhouse system?
A 2-vessel system saves space and cost but limits your ability to sparge independently, making it harder to brew complex or low-malt recipes. A 3-vessel system gives you a separate lauter tun for better control and is worth the extra investment if you plan to make multiple styles.
Is full automation worth it for a small brewery?
Full automation improves batch consistency and reduces labor, but it comes with higher upfront cost and ongoing software maintenance. For breweries with a small, stable recipe lineup, it can pay off quickly. For brewers still experimenting, a semi-automatic system offers more flexibility with less overhead.
How do I choose between electric, direct fire, and steam heating?
Electric is clean and efficient but requires high-capacity electrical service. Direct fire is simpler to install but risks scorching wort. Steam offers the best temperature control but adds a boiler and regulatory compliance. The choice depends on your utility infrastructure, budget, and comfort with mechanical systems.